
Web Interface on NetScaler 9.2.e nCore

This is pretty cool, i have been told about this feature some while ago, but today 28-10-2010, Citrix have released the integraded Webinterface on Netscaler, and its available today.

The solution requires the use of NetScaler MPX or VPX models with nCore.

The  Web Interface feature is available starting with version 9.2 47.9007e and higher.

Download and Install

Web Interface requires two components be installed on the NetScaler to start it: (1) A Java Runtime Environment (JRE), and (2) The Web Interface core. Both pieces are available as individual downloads on this page. You must download and install both components to make Web Interface work.

To begin, download the following software files. For faster installation, copy these tar files to a local workstation or to the /var directory of the NetScaler appliance.

  1. Download the Java Diablo Latte JRE 1.6.0.7 install file for FreeBSD 6.x (amd64) platform after accepting the license agreement terms for it. Get it free at:here.
  2. Download the Web Interface on NetScaler package (nswi-1.1.tgz) below. This is a set up file for installing Web Interface on NetScaler.
  3. Download the 9.2 Release 9.2.nc Build 47.9007e below.

Next, upgrade the NetScaler MPX or VPX to the 9.2_47.9007.e.nc build below. Instructions on upgrading the NetScaler are located in Upgrading to a Later Build within Release 9.2.e section of the Citrix NetScaler Migration Guide – Release 9.2.e.

Web Interface on NetScaler requires installation of the Web Interface package (nswi-1.1.tgz) and the JRE version 1.6.0.7 for FreeBSD 6.x (amd64) platforms. These files install all the Web Interface components and JRE on the NetScaler hard drive, and configure automatic startup of the Tomcat Web server with Web Interface at NetScaler startup time.

Once the NetScaler upgrade to 9.2.nc Build 47.9007e is completed, you are ready to install Web Interface on NetScaler.  At the NetScaler command prompt, type:
ns> install wi package -wi URL -jre URL

Example when files are remote from the NetScaler:
install wi package -wi “sftp://username:password@10.102.29.12/var/nswi-1.1.tgz” -jre “sftp://username:password@10.102.29.14/tmp/diablojre-freebsd6.amd64.1.6.0.07.02.tbz”

or

install wi package -wi “http://10.102.29.12/nswi-1.1.tgz” -jre “http://10.102.1.14/diablo-latte-freebsd6-amd64-1.6.0_07-b02.tar.bz2”

Example when files are local on the NetScaler:

install wi package -wi “file:///var/tmp/nswi-1.1.tgz” –jre “file:///var/tmp/diablo-latte-freebsd6-amd64-1.6.0_07-b02.tar.bz2”

From the NetScaler GUI, expand the System > Web Interface tab > Install Web Interface and browse to the location of the Web Interface on NetScaler package and the location of the JRE install file. For a demo on using the GUI to set up Web Interface on NetScaler, visit Citrix TV.

For detailed instructions on adding web interface site(s) and binding sites to the XenApp farm(s), reference the NetScaler Administration Guide 9.2.e in the section Web Interface. Examples are provided using the NetScaler command line and the configuration utility (GUI).

Download Web Interface on NetScaler 9.2.e nCore + components here

HOWTO install and configure Web Interface on Netscaler 9.2.e nCore
Application Launch Failure in Web Interface 5.0 through 5.3

Symptoms

Applications fail to launch on a windows 2008 server when .NET 1.1.x or .NET 4.0 is installed on the Web Interface server. When the user clicks to launch the published application, nothing happens. The browser might briefly show a request, however, the Citrix ICA client never attempts to connect.

Read more about the workaround -> http://support.citrix.com/article/CTX123921

How To configure Access Gateway Enterprise for Citrix Reciever for Iphone, Ipad

1. Configure the XenApp Services site

If you do not already have a XenApp Services site created, in the XenApp console or Web Interface console (depending on the version of XenApp you have installed), create a XenApp Services site for mobile devices.

The Receiver for mobile devices uses a XenApp Services site (formally Program Neighborhood Agent site) to get information about the applications a user has rights to and presents them to the Receiver running on the device. This is similar to the way you use the Web Interface for traditional SSL-based XenApp connections for which an Access Gateway can be configured. XenAppServices sites running on the Web Interface 5. x have this configuration ability built in.

Configure the XenApp Services site for the Receiver for mobile devices to support connections from an Access Gateway connection.

  1. In the XenApp Services site, select Manage secure client access > Edit secure client access settings.
  2. Change the Access Method to Gateway Direct.
  3. Enter the FQDN of the Access Gateway appliance.
  4. Enter the Secure Ticket Authority (STA) information.

2. Configure the Access Gateway appliance

  1. Configure authentication policies to authenticate users connecting to the Access Gateway using the Access Gateway Plug-in. Bind each authentication policy to a virtual server.Active Directory authentication, TACACS authentication, SMS authentication (http://smspasscode.com) (iPhone only), and RSA SecurID are the three supported authentication methods for v1.x of the Receiver for mobile devices:
    • If double source authentication is required (such as RSA SecurID and Active Directory), RSA SecurID authentication must be the primary authentication type. Active Directory authentication must be the secondary authentication type.
    • RSA SecurID uses a RADIUS server to enable token authentication.
    • Active Directory authentication can use either LDAP or RADIUS.
      Note: For servers prior to Windows Server 2003, Active Directory can use Integrated Windows authentication, also known as NTLM.

    Test a connection from a user device to verify that the Access Gateway is configured correctly in terms of networking and certificate allocation.

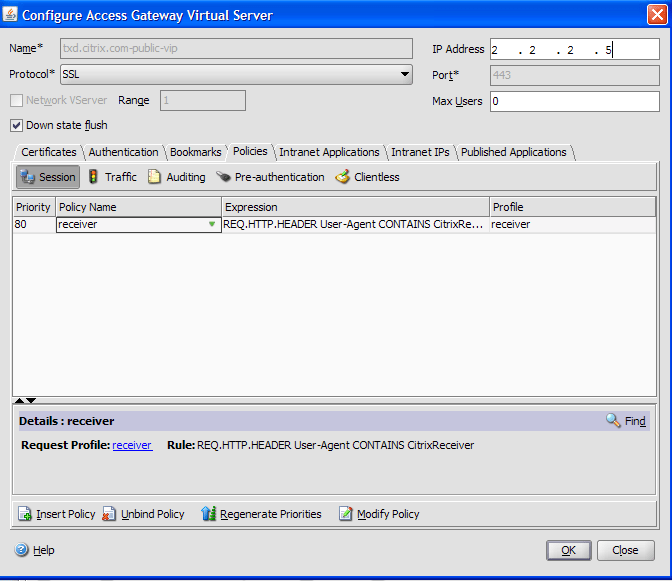
  2. Create a session policy on the Access Gateway to allow incoming XenApp connections from the Receiver, and specify the location of your newly created XenApp Services site.
    • Create a new session policy to identify that the connection is from the Receiver for mobile devices. As you create the session policy, configure the following expression and select Match All Expressions as the operator for the expression:REQ.HTTP.HEADER User-Agent CONTAINS CitrixReceiver
    • In the associated profile configuration for the session policy, on the Security tab, set Default Authorization to Allow.On the Published Applications tab, if this is not a global setting (you checked the Override Global check box), ensure the ICA Proxy field is ON.In the Web Interface Address field, enter the URL including the config.xml for the XenApp Services site that the device users use, such as http://XenAppServerName/Citrix/PNAgent/config.xml or http://XenAppServerName/CustomPath/config.xml.
    • Bind the session policy to a virtual server.
    • Create authentication policies for RADIUS and Active Directory.
    • Bind the authentication policies to the virtual server.
    Important: If the server certificate used on the Access Gateway is part of a certificate chain (with an intermediate certificate), make sure that the intermediate certificates are also installed correctly on the Access Gateway. For information about installing certificates, see the Access Gateway documentation.

3. Configure the mobile device for the Receiver application

  1. In Account Settings, in the Address field, enter the matching FQDN of your Access Gateway server, such as FQDNofAccessGateway.
  2. In the Citrix Access Gateway settings, turn on Access Gateway, set the Gateway Type to Enterprise edition, and select the authentication method.

Citrix Netscaler version 9.2 released

Today, at Interop – Las Vegas, Citrix announced the release of NetScaler 9.2. It’s available for download on MyCitrix.com for all customers with a valid maintenance agreement. You’ll definitely want to check out all the cool new features that make NetScaler 9.2 the most cloud-ready application network platform for virtual datacenters. NetScaler 9.2 transforms infrastructure into a shared service, delivering cloud-scale performance and unmatched entity scaling for consolidation, supports easy management of app infrastructure, accelerates Web 2.0 and multimedia in the cloud and brings enterprise SLAs and security to the cloud. With over 75 new features, NetScaler 9.2 transforms the economics of app delivery and makes virtual datacenters a reality for both enterprises and service providers. Key new capabilities in NetScaler 9.2 include:

Deliver Cloud Economics and Scale

NetScaler provides unmatched performance, scalability, consolidation and flexibility. New NetScaler MPX solutions deliver the industry’s first 50 Gbps appliance in an energy and space efficient 2U form factor and introduce unparalleled elasticity into the physical network with “Pay-as-You-Grow” – allowing customers to scale from 20 Gbps, 35Gbps and 50Gbps on the same physical appliance without the need for expensive forklift upgrades.

In addition, to support the rapid global adoption of IPv6 while simultaneously becoming the consolidation backbone for very large Service Providers, IPv6 performance and NetScaler’s capacity to support cloud-scale configurations has increased dramatically with NetScaler 9.2. IPv6 performance increases by 50% while IPv6-IPv6 HTTP requests per second increase by 4X, enabling organizations to standardize on IPv6 for better scale, quality and performance. NetScaler’s capacity to support thousands of tenants and their associated configuration services, entities and applications has increased by 2X-7X driving network consolidation and economies of scale and simplifying management.

Drive Next Generation Multi-Tenancy

Shared services is a key attribute of a virtualized datacenter. New Network Aware Policies and Policy-Based Routing features enable an application aware multi-tenant network by segmenting traffic by vLAN or other L2-L4 parameters. Additionally, new NetScaler AppExpert Template and Visualizer features simplify management, migration, monitoring and synchronization of application delivery policies. Specifically, templates from existing configurations can be created for easy import/export into test and dev environments by abstracting management complexity and allowing creation of environment specific configurations.

AppExpert Network Visualizer provides a completely new way to look at how NetScaler is connected to your network. This is a graphical and fully interactive view of your network. You can configure network components like interfaces and vLANs by clicking on them directly from the configuration map. It’s also possible to add channels, view properties of configured network-related entities, and pull down statistics and counters for a particular interface or vLAN.

Global Server Load Balancing (GSLB), by it’s nature, has several layers of configuration in the feature. Once you start adding a few sites and remote services, the configuration can start to become a little involved. The GSLB Visualiser is the perfect way to graphically represent your GSLB configuration. It will organize it intelligently by the domain names you are running on GSLB, and show you exactly which systems are up / down, and allow you to get statistics on each entity.

Bring Enterprise SLAs and Security to the Virtual Datacenter

New Active-Active capabilities provide greater high-availability and network utilization to ensure enterprise SLAs are met. In addition, new web services and XML security capabilities protect applications from attacks and help enterprises comply with security regulations. These include: cross-site request forgery protection, XML attachment checks, entity expansion attack protection, SOAP fault filtering, WSDL scanning protection and XPath injection protection.

To support the transition of various application workloads to off-premise cloud deployments while providing a seamless user experience, NetScaler 9.2 has various enhancements to its Global Load Balancing suite of features including spillover of user traffic which is a critical element to drive Cloud Burst scenarios.

Optimize delivery of Video, Web 2.0 and Multimedia

NetScaler 9.2 introduces 64-bit shared-memory caching.  High-end NetScaler MPX platforms can provide up to 24GB of memory cache capacity, to cache large video files at the service provider edge, or to offload back end servers. Delivery of Web 2.0 applications are optimized with new Fast XML XPath support, which provides deep XML payload inspection and enables high-performance business logic routing.

Additional resources:

Videos:

  • What’s New in NetScaler
  • NetScaler 9.2 – Performance and Scalability
  • Web Application Security in NetScaler 9.2
  • NetScaler 9.2 – Scalable App-Specific Optimization

Whitepaper:

  •  Is your load balancer cloud-ready?

Read the article