NVIDIA vGPU now supports Win7, Win8, Server2008R2, Server2012

NVIDIA have updated their drivers for vGPU. This is great so now you can even cut up the GPU more specially with support for Server 2008R2 & Server 2012 that could be used with Citrix XenApp. Before you could only do GPU pass-through and share the GPU with XenApp (DirectX/OpenGL), now each server can get a vGPU profile and share the GPU with XenApp the best scenario for TCO.

NVIDIA now supports following OS from Microsoft:

  • Windows 7 32bit & 64bit,
  • Windows 8 32bit & 64bit
  • Server 2008R2
  • Server 2012

FYI – What I see is missing is drivers for Windows 8.1 & Server 2012R2, hope NVIDIA release these drivers soon, so customers can virtualise their graphics on latest OS from Microsoft.

Source

Download NVIDIA vGPU drivers here 

learn more about NVIDIA vGPU here

Citrix 3D Graphics Pack (vGPU)

Citrix 3D Graphics Pack is the new name for the “Citrix Virtual GPU solution” that was introduced in October 2013 in Tech Preview which is NVIDIA vGPU and XenServer/XenDesktop components. The cool thing about this release is that NVIDIA vGPU is now released and no more “technical preview/beta” and the product have been fully built into XenServer and Citrix have created some amazing GUI in XenServer 6.2 XenCenter and XenDesktop 7.1. There is a cool new SDK commands to fully automate the GPU commands if you want to use the CLI method instead of the GUI mode. December 16th, Citrix released support for GPU virtualization using XenDesktop 7.1 HDX 3D Pro with XenServer 6.2 SP1 in the Citrix 3D Graphics Pack (see http://www.citrix.com/go/vgpu). This means that multiple users can share a single GPU, overcoming the 1:1 ratio to achieve higher user densities and create a more cost-effective remote 2D/3D virtualization solution.

  • Kudos to NVIDIA for building the vGPU
  • Kudos to Citrix XenServer team for integrating the vGPU into the Xen
  • Kudos to Citrix XenDesktop team for integrating the vGPU into the XenDesktop
  • Kudos to all the Citrix HDX 3D crew

vgpu1

What is Citrix 3D Graphics Pack

The Citrix 3D Graphics Pack enables true hardware GPU sharing of NVIDIA GRID Graphics cards providing the industry’s highest performance virtualized professional graphics app acceleration. This technology was first unveiled at Citrix Synergy 2013 and allows GPU sharing for Virtual Desktop Infrastructure (VDI) for XenServer, XenDesktop and NVIDIA GRID GPUs.

XenServerGPU pass-through improvements including XenCenter configuration.

Citrix/NVIDIA XenServer w. vGPU Architecture

vgpu architecture

Sizing NVIDIA vGPU profile

pGPU vs vGPU

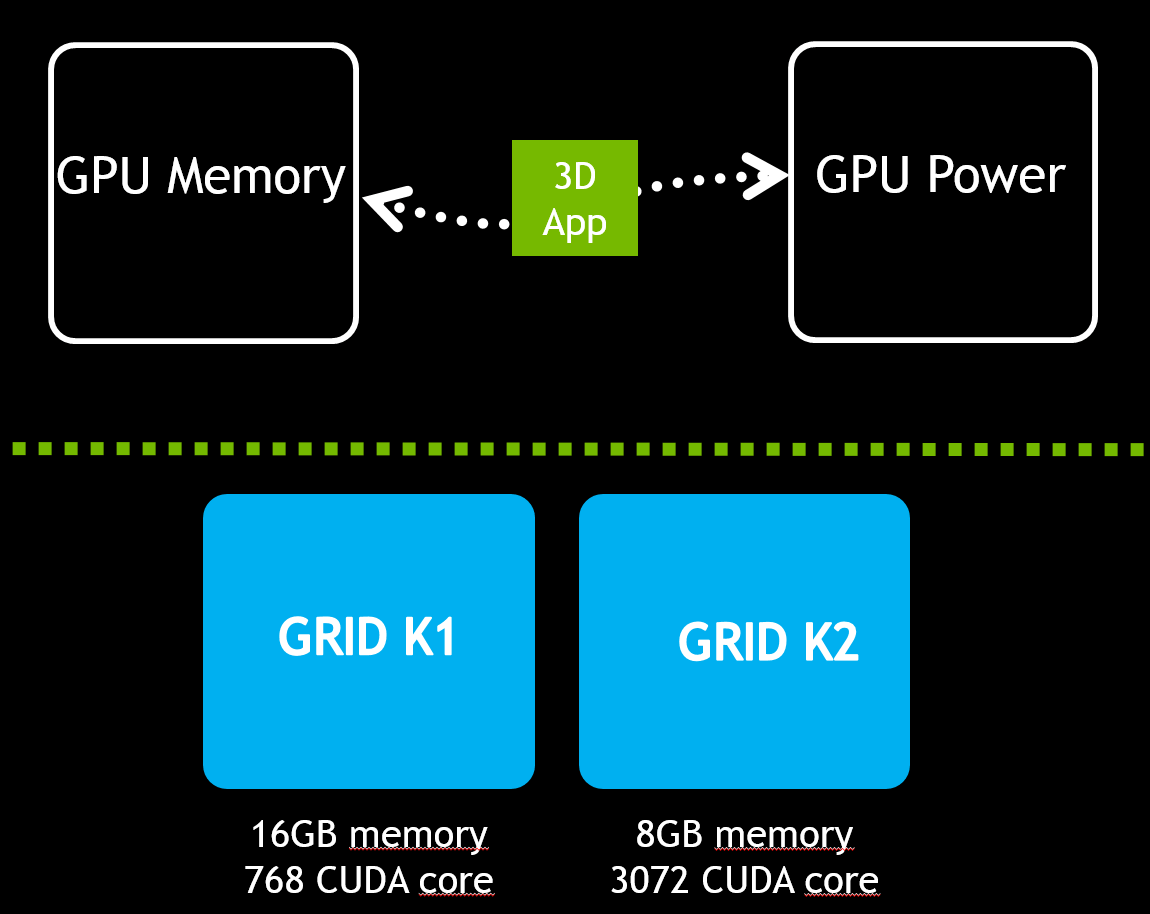
NVIDIA vGPU profiles are designed different with amount of memory, CUDA cores and frame buffer, amount of display and display resolution pr GRID GPU type.

I have added more informations than Citrix and NVIDIA does in their branding.
vGPU OS support is one of the important things where you clearly see which OS is supported on Pass-through profile vs vGPU profiles.

vGPU profiles

Which GRID to choose

GRID_K1_vs_K2

Whats new in XenServer 6.2 SP1

  • The 3D Graphics Pack supporting NVIDIA GRID GPUs
  • Support for Windows 8.1 and Windows Server 2012 R2
  • Improvements to the Site Recovery wizard for large deployments
  • GPU pass-through improvements including XenCenter configuration.
  • New SR wizard allows up to 50 new fibre-channel HBA SRs to be created in a single step.
  • Security Hotfix and functional Hotfix roll-up.
  • New SDK for XenServer 6.2.0 Service Pack 1 is ideal for developers wishing to access programmatically XenServer’s new management features for GPU virtualization (including the new vGPU and GPU pass-through). The five available XenServer SDKs, one for each of C, C#, Java, PowerShell and Python, expose the new XenAPI commands for working with physical GPUs (pGPUs), GPU groups, virtual GPUs (vGPUs) and virtual GPU types. The GPU technologies for XenDesktop and XenServer do of course also come with rich GUI configuration operations and provisioning via XenCenter, XenDesktop and MCS.Citrix last few development cycles they have invested in re-writing XenServer’s PowerShell API to provide developers and administrators with a PoSH alternative to using the XenServer command line (CLI) interface. In particular this interface is proving popular with those looking to automate bespoke vGPU and GPU pass-through configuration and benchmarking or auto-test frameworks. The PowerShell API is also a popular choice for XenDesktop and Windows administrators working with XenServer. Read more about the SDK here

Whats new in NVIDIA GRID vGPU Pack

GA of NVIDIA GRID vGPU Manager + Windows Display Driver

  • Latest NVIDIA GRID vGPU Manager is version  (331.30)
  • Latest NVIDIA GRID vGPU Windows Display Driver (332.07) for Windows 7, Windows 8, Server 2008R2, Server 2012.

Important if you implemented XenServer vGPU tech preview

  • Customers who have previously installed the vGPU Tech Preview (XS62ETP001) on a host, cannot subsequently install Service Pack 1. Customers wishing to install Service Pack 1 will need to do a fresh installation of XenServer 6.2.0, before installing Service Pack 1.

How to implement Citrix 3D Graphics Pack

Download Citrix XenServer 6.2 + SP1
Download NVIDIA GRID vGPU Pack for GRID K1 or GRID K2
Download Citrix XenDesktop 7.1 99 user trial or licensed software here (require MyCitrix ID)

install vgpu

1. Start with a fresh XenServer 6.2 installation on a GRID supported hardware
2. Install Service Pack 1 on the XenServer 6.2
3. Download the NVIDIA GRID vGPU Pack and unzip the contents; install NVIDIA GRID manager in XenServer from the CLI
4. Create a Windows 7 VM (this will be the base image)
5. From the XenCenter GUI, assign a vGPU type to the base image
6. In the Windows 7 VM:
a. Install NVIDIA GPU guest OS driver (available in the NVIDIA GRID vGPU Pack)
b. Install the XenServer Tools
c. Install the latest version of Citrix HDX 3D Pro VDA 7.1
7. Create a Machine Catalog using MCS to provision new VMs based on the base image or you can also use Citrix Provisioning Services (PVS)
8. Create Delivery Group, assign users, and publish the desktops
9. Access virtual desktops using Citrix Receiver. No GPU is required on the end-point devices
10. Validate GPU sharing by multiple desktops, using monitoring tools like Process Explorer from Microsoft

GUI enhancements in XenCenter for XenServer 6.2 SP1

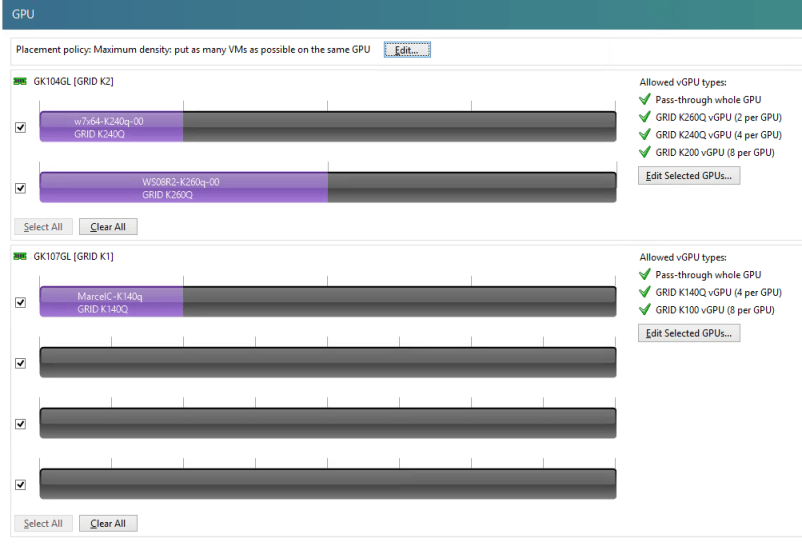
In the Citrix XenCenter, there is a new tab called “GPU” at the host level. The appropriate vGPU types attached to the host are defined in this GUI, and made available to the virtual machines (VM). Depending on the requirements, one can also define the GPU placement policy here. This tab also makes it very convenient to visualize how many vGPU’s are already attached, and the physical GPU’s where they get placed.
This makes later troubleshooting simpler.
GPU-01


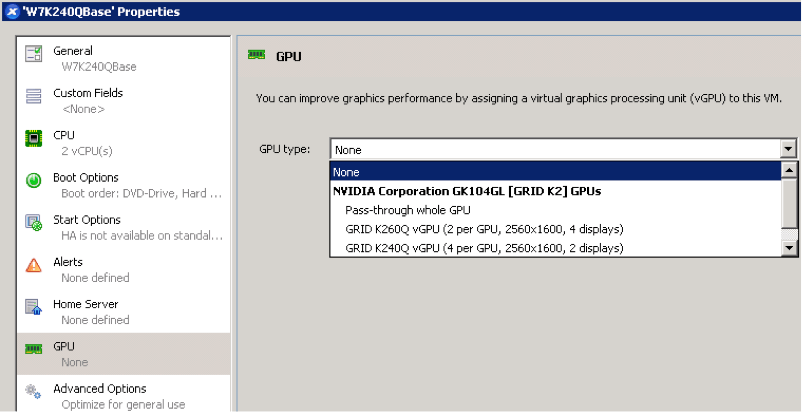
At the VM-level in XenCenter, the vGPU can be selected as part of VM properties or during New VMcreation on GPU enabled hosts. In the tech preview, this was a laborious step in the CLI. Now, simply determine the suitable vGPU Profile for your use-case and select it from the drop-down list. Once the VM is created, it boots into the Windows standard 800X600 VGA resolution. The vGPU features are available once the guest driver is installed in the Windows VM.

XC-VM

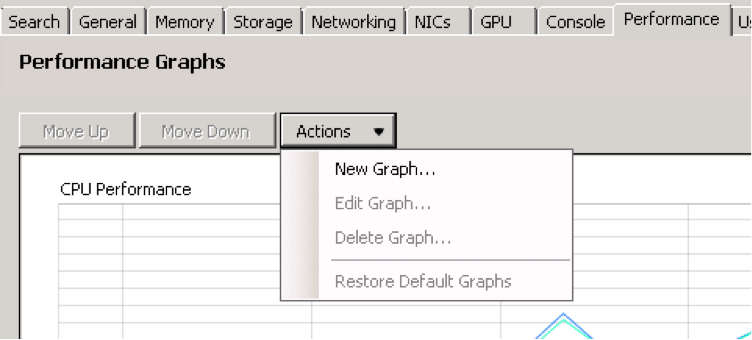
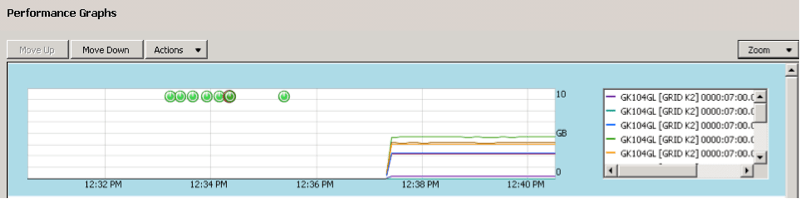
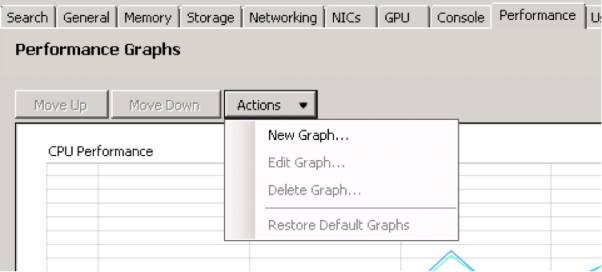
GPU performance graphs are available under the Performance tab of XenServer host. On first-run, these graphs have to be added to the view. Subsequently, they can be moved up or down and can show one or more of the installed GPUs.
GPU-graph-01

GPU-Graph-02

GUI enhancements in XenDesktop 7.1 with XenServer 6.2 SP1

There are few GPU related enhancements on the XenDesktop consoles, and automated-provisioning of vGPU-enabled VMs using Machine Creation Services (MCS) is the one we’ve been waiting for. Simply attach a vGPU to the base VM, install the virtual delivery agent (VDA for HDX 3D Pro), and install the required graphics apps. Then head over to XenDesktop Studio to create the machine catalog. The only part to exercise caution is not to perform a Sysprep after creating a vGPU-enabled base image, else it wipes out the vGPU information.

In Studio, the vGPU Type must be defined while creating the host settings to be used as a platform for the MCS machines.

MCS-host

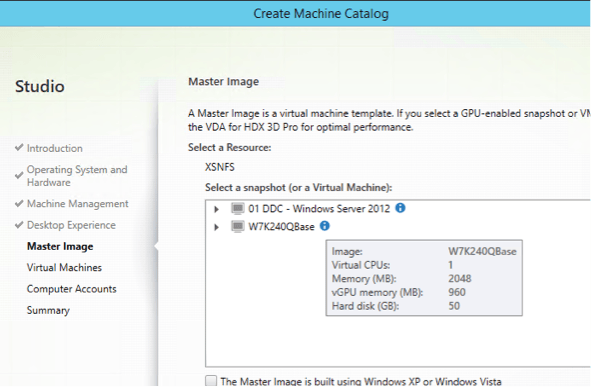
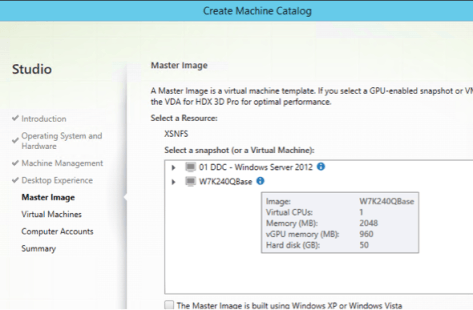
Subsequently, proceed to creation of a machine catalog as usual. The exact steps are outlined in the Reviewer’s Guide. At the step where MCS base image is chosen, hovering over the image name shows information to confirm if you have a valid vGPU-enabled master image.
MCS-base

The remaining process to create machine catalog, create delivery group, and assign users is no different than the usual way of delivering desktops and apps. Use the latest Citrix Receiver to access 3D apps.

Tweak XenServer 6.2.x for GPU intense applications/performance

Below articles are critical to follow, no matter if you use GPU pass-through or vGPU profiles with your virtual machines.
I have seen many GPU intense applications that uses the Turbo mode or the max CPU clock frequency and if you think Turbo mode work out of the box, think again. Many virtualize their 3D applications and will have an impact on this if this is not configured.

Follow this article How to use host-cpu-tune to fine tune XenServer 6.2.0 performance

Follow this article How to investigate and use Turbo mode, C-States and P-States in XenServer

Tweak Citrix XenDesktop 7.1 HDX 3D Pro.

I have seen multiple issues with performance, now Citrix have officially shared the informations, so shall I help you position how to tweak XenDesktop 7.1 HDX 3D. Following tweaks are for XenDesktop 7.0 & 7.1 VDA’s.

  • With high screen resolutions (such as 2560×1600), a lower than expected Frames per Second (FPS) may be apparent, impacting user experience.
    Change Encodespeed from
    [HKEY_LOCAL_MACHINE\SOFTWARE\Citrix\Graphics]”EncodeSpeed”=dword:00000002
    to [HKEY_LOCAL_MACHINE\SOFTWARE\Citrix\Graphics]”EncodeSpeed”=dword:00000001
    registry key to work around this issue.
  • While connecting to high resolution displays (for example: 2560×1600) artifacts of previously opened windows can remain. To ensure that the screen is refreshed, users can add the following registry key:
    [HKEY_LOCAL_MACHINE\Software\Citrix\HDX3D\BitmapRemotingConfig]”HKLM_EnableDirtyRect”=dword:00000000

Source

Software – Download vGPU (GRID Manager + GRID drivers) + XenServer 6.2 SP1 here

Ctx article – How to Resolve GPU Memory Mapping Issues in XenServer *important to check if you want to use vGPU

Citrite Mayunk Jain blogpost Super Easy GPU Sharing with XenDesktop 7.1: Introducing 3D Graphics Pack

Citrite Mayunk Jain Reviewer’s Guide for Delivering 3D Graphics Apps: Part 3 (vGPU)

Citrite Konstantina Chremmou blogpost – Configuring vGPU and GPU pass-through using the PowerShell SDK for XenServer 6.2.0 Service Pack 1

Citrite Rachel Berry blogpost – Configuring XenServer to use Turbo mode – including for 3-D graphically intense applications

Xen Team Advice for developers and partners working with GPUs

Alexander Ervik (CTP)  Shows how to enable NVIDIA vGPU support in XenServer 6.2 SP1 with Dell R720

Citrix blogpost – True hardware GPU sharing with XenDesktop and NVIDIA GRID arrives!

Citrix FlexCast Services: Virtualize 3D professional graphics

Citrix Technical and Training Materials about vGPU & HDX 3D Pro

NVIDIA GRID certified OEM servers

NVIDIA GRID certified applications

Citrix XenDesktop 7.1

Citrix XenDesktop 7.1 is now finally released and vGPU is now in the product and build in with MCS, very very cool. You can configure GPU pass-through with any GPU card or vGPU profiles with NVIDIA GRID, the brilliant thing about this its now build in to the product, you only have to choose a GPU profile and XenDesktop takes care of the High Availability with XenServer and find the resources that free and connects the GPU to the Virtual Machine. Microsoft have just released Windows 8.1 and Server 2012R2 and in this release of Citrix XenDesktop 7.1, Citrix are supporting Microsoft newest Operating System Platforms.

One of the things that have been fixed in the XenDesktop 7.1 Virtual Delivery Agent is following:

  • With HDX 3D Pro enabled, the NVIDIA card might not support certain resolutions. This enhancement introduces support of up to 2560×1600 pixel resolutions.
  • With HDX 3D Pro enabled, client connections to a XenDesktop 5.6 VDA do not support resolutions beyond 1900×1200 pixels. This enhancement introduces support for a wide range of additional resolution ratios, including:
    • 1920×1200
    • 2048×1152
    • 2560×1440
    • 2560×1600

What’s new in XenDesktop 7.1

  • GPU — The Graphical Processing Unit (GPU) capabilities feature provides graphics virtualization, offering a superior experience for users who use graphic-intensive applications and often manipulate 3-D models. The GPU feature also can improve the graphics experience for a large number of users. Administrators can evaluate workflows for the creation of GPU-capable connections and machine catalogs created with an MCS-provisioned master image. If problems are encountered, then Administrators may need to manually create the machines.

When you install Citrix XenDesktop 7.1 on the Controller, you can now choose a GPU type and group which its getting from XenServer.


vgpu_option_in_XenServer_-_build_XD

If you have NVIDIA GRID with XenServer, XenDesktop 7.1 takes care of creating a GPU type attached to the GPU group.

vgpu_option_in_XenServer_done_-_build_XD

in above example I am choosing a vGPU type: K140Q. It have 960MB video RAM per VM)

If you have 1 GRID K1 card and choose a K140Q type, you can have maximum 16 virtual machines assigned to this card. If you have 2 GRID K1 and choose  K140Q type, then you can have 32 virtual machines assigned to the GROUP K1, and XenDesktop 7.1/XenServer vGPU takes care of the HA of GPU assignment.

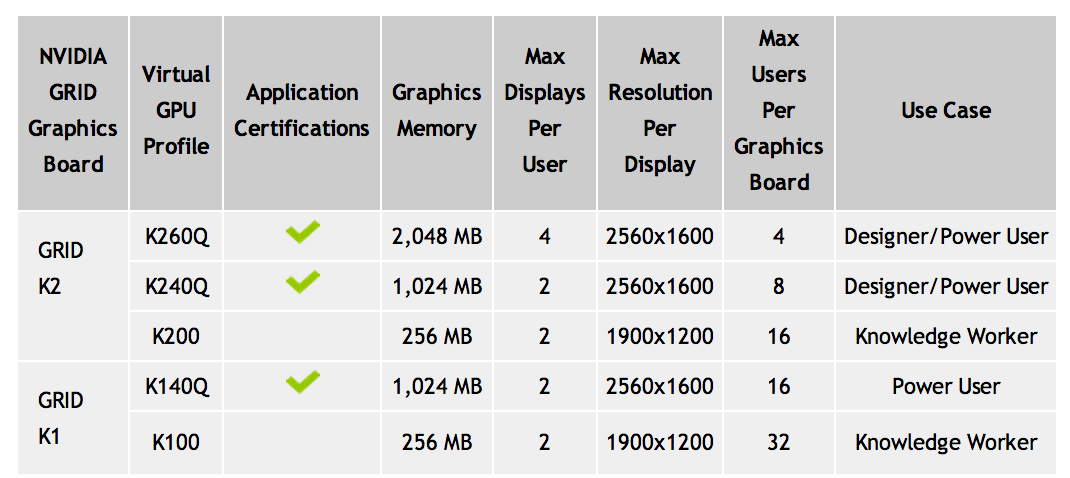
Look at below chart to get an understanding of which vGPU types you can choose in XenDesktop 7.1 with NVIDIA GRID K1 & K2.

Read my blogpost about vGPU profiles

vgpu-profile

The above numbers are from NVIDIA but the vGPU types Citrix have defined in XenDesktop 7.1 are following:

for NVIDIA GRID K1 vGPU options:

  • GRID K100 (256B video RAM per VM)
  • GRID K140Q (960MB video RAM per VM)
  • Passthrough – GK107 GL GRID K1

for NVIDIA GRID K2 vGPU options:

  • GRID K260Q (1920MB video RAM per VM)
  • GRID K240Q (960MB video RAM per VM)
  • GRID K200 (256MB video RAM per VM)
  • Passthrough – GK104GL


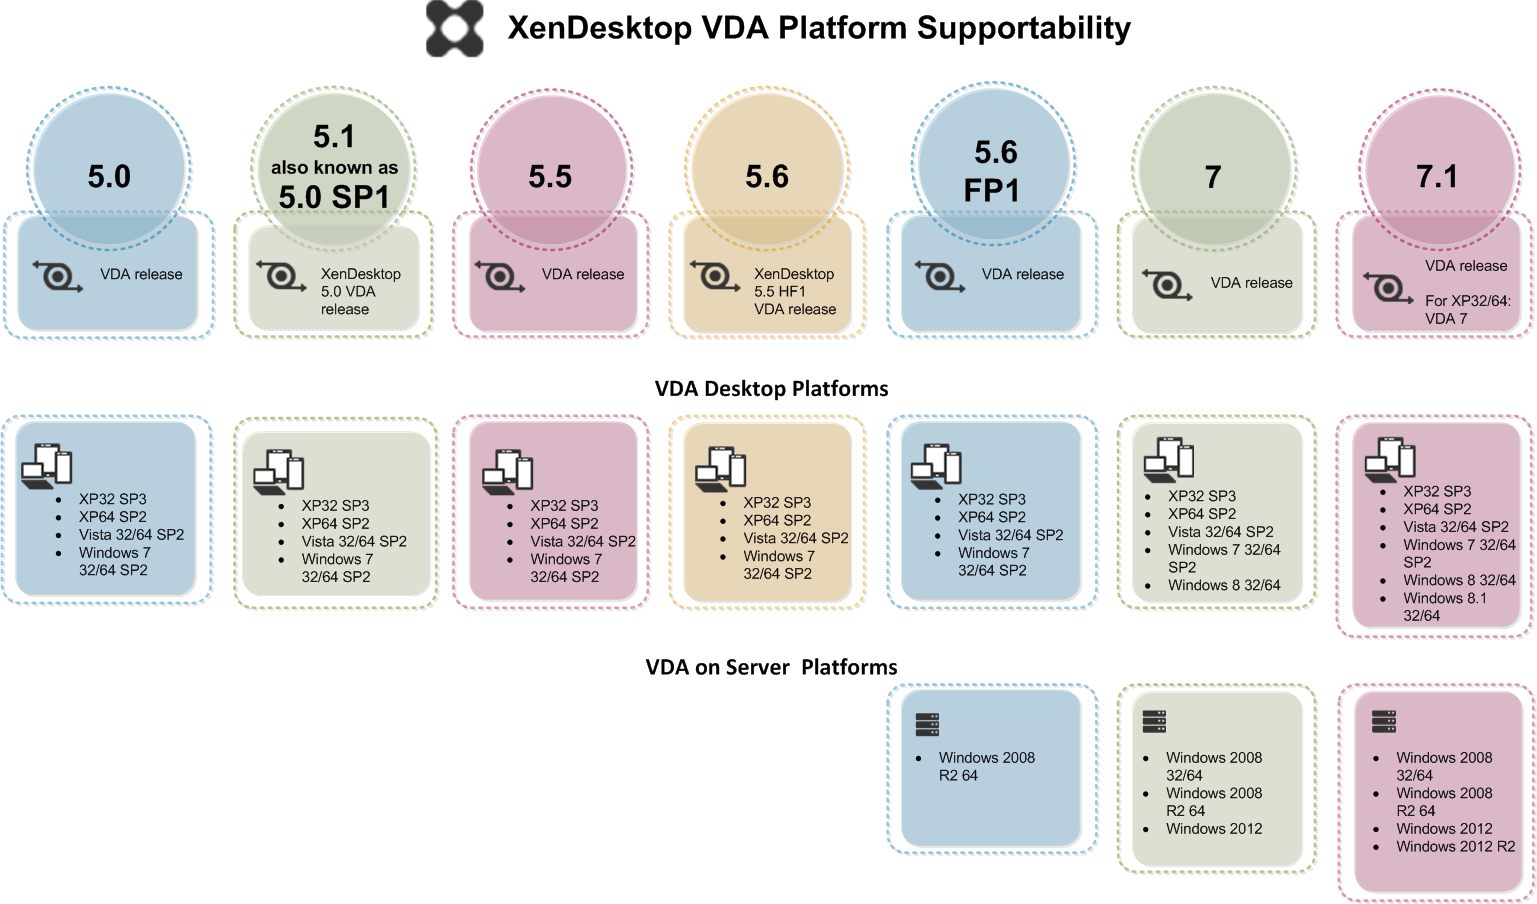
  • Windows Server 2012 R2 and Windows 8.1 support — Deliver a high-definition user experience on Windows 8.1 virtual desktops and physical machines. HDX 3D Pro has also been upgraded to support Windows 8.1.

vda-platform-support


Upgrade XenDesktop 7 components to 7.1

When you run the installer AutoSelect, the wizard checks whether certain Site components (such as the Delivery Controllers, Director, and VDAs), need to be upgraded. If you opt not to upgrade some components during this process, when you run Studio, it performs a component check and notifies you when components need to be upgraded. You cannot proceed to manage your Site until you upgrade these components.

Upgrade Site with components deployed on different machines

The following figure shows the high-level processes involved when upgrading a XenDesktop 7 to XenDesktop 7.1 in which Studio components are deployed on different machines.

Perform the upgrade procedures in the following order.

Check the licenses

Make sure that your Subscription Advantage date for licenses is no earlier than 2013.0522.

Upgrade StoreFront

If StoreFront is deployed on a separate machine, follow the steps described in Upgrade core components from eDocs

Upgrade Director

If Director is deployed on a separate machine, follow the steps described in Upgrade core components from eDocs

Upgrade Provisioning Services

If you are using Provisioning Services, follow the procedures described in Upgrading Provisioning Services from eDocs

Upgrade the Virtual Delivery Agent

For Remote PC Access deployments, Citrix recommends that you upgrade a VDA in a remote PC using a command-line method. For detailed information, see Install using the command line.

  1. Log on to the server using a local administrator account and run the installer by inserting the media or mounting the ISO drive for this release, and double-clickingAutoSelect.
  2. On the Welcome page, click Start. The wizard detects what components need to be upgraded and displays the Upgrade options page, activating the components you can upgrade.
  3. On the Upgrade options page, select:
    • Virtual Delivery Agent for Windows Desktop OS for Desktop OS, and earlier XenDesktop versions
    • Virtual Delivery Agent for Windows Server OS for Server OS
  4. On the Firewall page review the default ports and configure firewall rules.
  5. On the Summary review the prerequisites to be installed and the components to be upgraded then click Upgrade.
  6. On the Finish Upgrade page one of the following messages appears upon completion:
    • Success — Upgrade successful appears when the upgrade completes without errors.
    • Failed — The Upgrade failed appears with a list of failed components. Click Why did this fail to review what you must do to fix the problem. Other components that installed successfully are retained; you do not need to reinstall them.
  7. Click Finish to complete the upgrade.

Upgrade Delivery Controllers

Citrix recommends that you upgrade Delivery Controllers as follows:
  1. Upgrade half of your Site’s Delivery Controllers.
  2. Use the upgraded version of Studio to perform the Site upgrade as described in Upgrade core components.
  3. Upgrade your remaining Delivery Controllers.

Upgrade Databases using Studio

Use Studio to upgrade the Database.

Automatically upgrade Databases

  1. Start Studio. The wizard detects what components need to be upgraded and displays the Mandatory upgrade page.
  2. Select Start the Site upgrade automatically.
  3. At the prompt, select I am ready to upgrade.The wizard displays the upgrade progress. After the upgrade completes, the wizard performs tests. This takes several minutes.
  4. At the Site Upgrade Complete window, you can optionally view a data migration report and then click Finish.
  5. At the Upgrade successful page, click Finish upgrade and return to the Site overview.

Manually upgrade Databases

To minimize Site down time when performing a manual upgrade, it is important that the XenDesktop Administrator closely coordinates with the Database Administrator. This process requires that you run a script that temporarily disables Xendesktop Services while the manual upgrade scripts are run by the Database Administrator using a preferred tool (for example, SQL Server Management Studio). Ideally, immediately after these scripts complete, the XenDesktop Administrator should enable XenDesktop Services and complete the upgrade using Studio.

Manual upgrade requires:

  • Backing up the databases
  • Running the generated scripts in the following order:
  1. DisableServices.ps1 — PowerShell script to be run by the XenDesktop administrator on an XenDesktop Controller.
  2. UpgradeSiteDatabase.sql — SQL script run where the Site databases resides
  3. UpgradeMonitorDatabase.sql — SQL script run where the Monitor databases resides.
  4. UpgradeLoggingDatabase.sql — SQL script run where the Logging database resides.
    Note: You should only run this script if the Logging database changes. For example, run it after applying a hotfix.
  5. EnableServices.ps1 — PowerShell script to be run by the XenDesktop administrator on an XenDesktop Controller.

To upgrade manually

  1. Start Studio. The wizard detects what components need to be upgraded and displays the Mandatory upgrade page.
  2. Select Manually upgrade this site.
  3. The wizard checks for License Server compatibility. Make sure your License Server and license files are compatible with XenDesktop 7.1. Select the confirmation check box and click Continue.
  4. The wizard prompts you to backup the Database. When you have done so, select the confirmation check box and click Continue.
    • The wizard generates the manual upgrade scripts that you must run and displays them in a window
    • The Mandatory Upgrade page changes to display a checklist of the manual upgrade steps
  5. Make sure you have completed the checklist tasks and click Finish upgrade and return to Common Tasks.

Upgrade core components

The installer automatically upgrades core components such as Delivery Controllers, Studio, and Director if they were previously installed.

  1. Log on to the server using a local administrator account and run the installer by inserting the media or mounting the ISO drive for this release, and double-clickingAutoSelect.
  2. On the Welcome page, click Start. The wizard detects what components need to be upgraded and displays the Upgrade options page, activating the components you can upgrade.
  3. Click Delivery Controller.
  4. Accept the license agreement.
  5. Review the upgrade steps, click I’m ready to continue and click Next.
  6. On the Core Components page review the components available for upgrade.
  7. On the Firewall page review the default ports and configure firewall rules.
  8. On the Upgrade page review the prerequisites to be installed and the components to be upgraded and then click Upgrade.
  9. On the Finish Upgrade page one of the following messages appears upon completion:
    • Success — Upgrade successful appears when the upgrade completes without errors.
    • Failed — The Upgrade failed appears with a list of failed components. Click Why did this fail to review what you must do to fix the problem. Other components that installed successfully are retained; you do not need to reinstall them.
  10. Click Finish to complete the upgrade.

Upgrade a Site with components deployed on the same machine

The following figure shows the high-level processes involved when upgrading a Site in which all components are deployed on the same machine.

Upgrade XD7 on a single machinePerform the upgrade procedures in the following order:

  1. Make sure that your Subscription Advantage date for licenses is no earlier than 2013.0522.
  2. Back up the Controller databases.
  3. Optionally back up templates and upgrade Hypervisor.
  4. Upgrade PVS servers and agents as described in Upgrade Provisioning Services from eDocs
  5. Upgrade the core components as described in Upgrade core components from eDocs
  6. Upgrade Virtual Desktop Agents as described in Upgrade the Virtual Delivery Agent from eDocs
  7. Upgrade the Database using Studio as described in Upgrade Databases using Studio from eDocs
  8. Upgrade the remaining Delivery Controllers.

Post upgrade processes

After the upgrade and data migration is complete, you can run environment and configuration tests to make sure that the Site is in functional order.

To test the upgraded site, select Test Site n the Site Configuration pane of the Studio Common Tasks page.

Source

If you want to upgrade your current Citrix XenDesktop 7 environment to XenDesktop 7.1. environment look here

fixes in XenDesktop 7.1 – Virtual Delivery Agent

fixes in XenDesktop 7.1 – Controller 

Download Citrix XenDesktop 7.1 here (Require MyCitrix ID)

Hardware OEM supported NVIDIA GRID config

Hi all

NVIDIA have updated their list over hardware vendors that are supported with NVIDIA GRID.

I have made a spreadsheet that eventual will be updated with more informations like:

  • Hypervisor support
  • Required bios version for GRID support / hypervisor
  • How to configure BIOS for GRID enablement
  • Tested app + much more.
  • Supported drivers
  • Tested remote desktop visualization technologies
  • vGPU

This article helps you get a fast overview which hardware support which amount of NVIDIA GRID’s.

The informations are some I have gathered on my own, some are from the hardware vendor, some you can check at NVIDIA.
I will update this article, when there are new servers and when I have more informations to reveal about above.

Important info: You can mix the GRID’s so a server can have either if it supports K1 and K2 you can have a server configured with both 1 K1 & 1 K2 if the server supports 2 GRID K1 or 2 GRID K2. The below list shows only support total amounts of either K1 or K2 and not mix.

serversupportedgrids

Source

NVIDIA


Citrix Virtual GPU Solution Tech Preview

Citrix and NVIDIA have released Citrix Virtual GPU solution technical preview. Its out, go get it, its time for virtualizing the GPU.

NVIDIA GPU Virtualization with XenDesktop and XenServer

The Citrix Virtual Graphics Processing Unit (vGPU) Tech Preview showcases the industry’s highest performance virtualized professional graphics app acceleration with NVIDIA GPUs. This technology was first unveiled at Citrix Synergy 2013 and allows users to obtain true hardware GPU sharing for Virtual Desktop Infrastructure (VDI) with XenServer, XenDesktop and NVIDIA GRID GPUs.

vgpu1

NVIDIA GRID Virtual GPU (vGPU) Technology

NVIDIA GRID software brings the full benefit of NVIDIA hardware-accelerated graphics to virtualized solutions. This gives you exceptional performance in two primary uses:

  • GPU pass-through that provides a virtual machine access to a dedicated GPU
  • GRID Virtual GPU (vGPU) technology that provides the most advanced way to share a GPU

NVIDIA GRID vGPU is the industry’s most advanced technology for sharing true GPU hardware acceleration between multiple virtual desktops without compromising the graphics experience. Application features and compatibility are exactly the same as they would be at the desk.

With vGPU technology, the graphics commands of each virtual machine are passed directly to the GPU, without translation by the hypervisor. This allows the GPU hardware to be time-sliced to deliver the ultimate in shared virtualised graphics performance.

virtual-gpu-technology-en


vGPU profiles mean customized, dedicated graphics memory.

Take advantage of vGPU Manager to assign just the right amount of memory to meet the specific needs of each user. Every virtual desktop has dedicated graphics memory, just like they would at their desk, so they always have the resources they need to launch and use their applications.

vGPU Manager enables up to eight users to share each physical GPU, assigning the graphics resources of the available GPUs to virtual machines in a balanced approach. Each NVIDIA GRID K1 graphics card has up to four GPUs, allowing 32 users to share a single graphics card.

vgpu-profile

The GPU profiles ending in Q undergo the same rigorous application certification process as our NVIDIA® Quadro® workstation-class processors. For a list of certified applications, download NVIDIA GRID Remote Workstation Certifications

The GRID K100 and K200 GPU profiles are designed for the lighter graphics workloads associated with the applications that knowledge workers and power users use most of their time. These include Windows 7 with Aero enabled, viewing rich web content such as Adobe Flash or HTML 5, or simply getting the full interactive experience of Microsoft Office (PowerPoint, Excel, Word). To understand more about the graphics requirements of your applications, consult your application vendor.

NVIDIA vGPU with Citrix XenServer

NVIDIA GRID vGPU enables multiple Virtual Machines (VM) to have simultaneous, direct access to a single  physical GPU, using the same NVIDIA graphics drivers that are deployed on non-virtualized Operating Systems. Under the control of NVIDIA’s GRID Virtual GPU Manger, which runs in XenServer’s Control Domain (dom0),  GRID physical GPUs are capable of supporting multiple virtual GPU devices (vGPUs) that can be assigned directly to VMs.

Guest VMs use GRID virtual GPUs in the same manner as a physical GPU that has been passed through by the hypervisor; an NVIDIA driver loaded in the guest VM provides direct access to the GPU for performance critical fast paths, and a paravirtualized interface to the GRID Virtual GPU Manager.

This Tech Preview release of vGPU for XenServer supports configuration of vGPU using the xe Command Line Interface (CLI). The Citrix XenCenter Management Console does not currently support GRID vGPU configuration.

Configuration of GPUs using the xe CLI is abstracted into four objects:

  1. Physical GPUs
  2. GPU Groups
  3. vGPU Types
  4. vGPUs

Available vGPU Types

NVIDIA Grid K1 and K2 cards contain multiple Graphics Processing Units (GPU). GRID K1 cards contain four GK107GL GPUs, and GRID K2 cards contain two GK104GL GPUs. Each physical GPU (pGPU) can host several different types of virtual GPU (vGPU). vGPU types have a fixed amount of framebuffer, number of supported display heads and maximum resolutions, and are targeted at different classes of workload.


vgpu

For example, a GRID K2 card, has two physical GPUs, and can support three types of vGPU; GRID K200, GRID 240Q, and GRID 260Q.

Pre-requisites:

To run Citrix XenDesktop with VMs running NVIDIA vGPU, you will also need:

  • Citrix XenDesktop Tech Preview full installation – available from www.citrix.com/techpreview/xendesktop

Note: No other versions of Citrix XenServer or XenDesktop are currently supported for use with NVIDIA virtual GPUs.

Source

Download Citrix Virtual GPU solution technical preview here

Download NVIDIA GRID vGPU Manager and Installation Guide here

Hardware requirements for NVIDIA GRID vGPU